Tuesday, February 17

Burning Orange Maxi


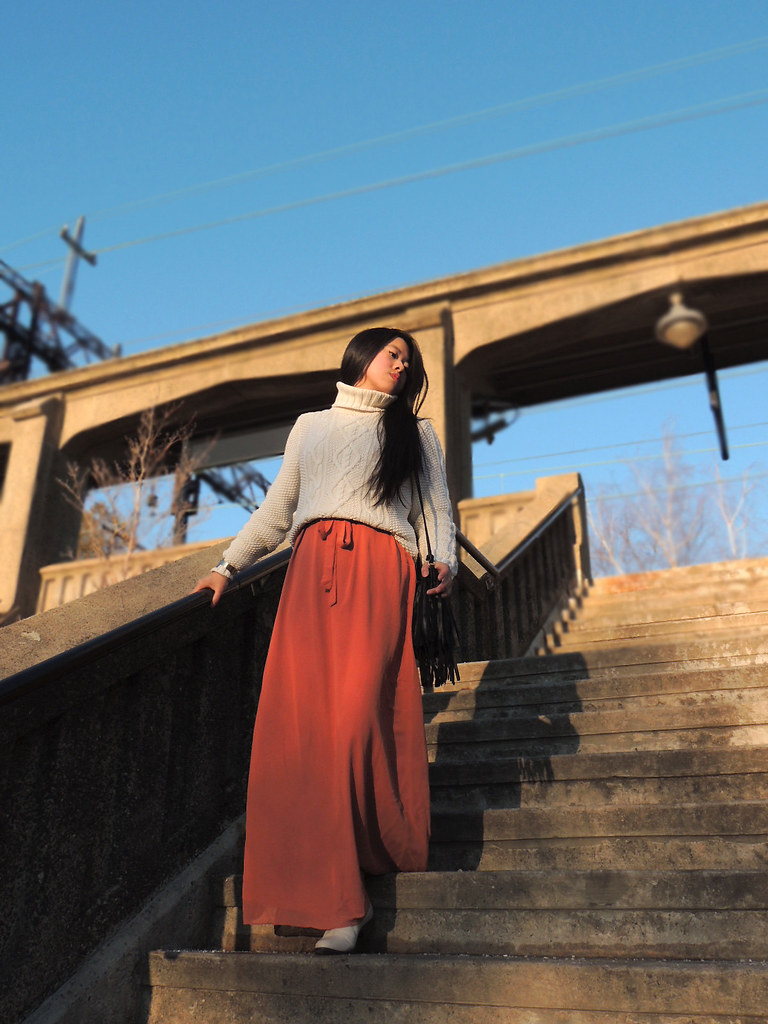
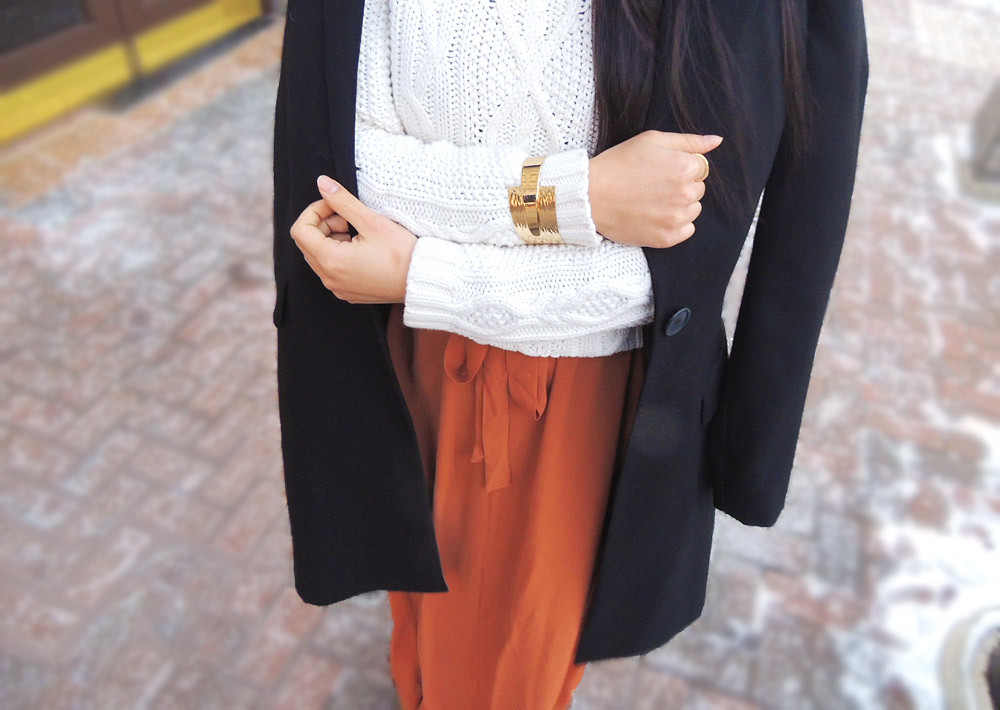
Sweater | Ralph Lauren (thrifted)
Dress | Forever 21 (worn as a skirt)
Fringe Bag | H&M 
Leather Boots | Asos
Gold Cuff | Vintage


I originally had a fear of maxi dresses, midi dresses, A-line dresses...Let's start over; I had a lot of fashion fears. This blog pushes me to try new things; walk outside of my comfort zone. As easy as jeans and a tee are, I want to keep my readers inspired and encourage you to do the same.

When maxi skirts and dresses first came out, I didn't dare go near them. I kept imagining myself being swallowed alive by the fabric, tripping all over myself, and swearing like a sailor all the way down to the ground.
I cringe at the thought.

One day, while browsing through my daily fashion blog reel, someone posted an outfit of herself in a maxi dress. She looked like a modern day Grecian goddess who looked right at home between towering skyscrapers and over-sized sunglasses. I attributed this to her height. I thought "anything looks good on a girl who is 6 feet tall whose legs go on for miles." Not long after, maxi skirts started popping up all over, and they looked good on everyone!

I figured let me buy an inexpensive maxi dress, and experiment with it. If it worked out, then yay for me! If it didn't, then I wouldn't be too put out. Not only did I luck out with a beautiful burnt orange, the dress also came with adjustable straps so I could get away with flats some days.

Although maxis are associated with sunny beaches and palm trees, they are just as season appropriate on Jersey's coldest winter days. Just throw a chunky knit sweater or turtleneck as I did, and some ankle boots with thick knit socks, and you're ready to take on this 'winter wonderland' ;)


Also, don't forget! My coupon code for Eshakti is valid until March 4, 2015 so be sure to shop their wide selection here. Just use the coupon code "dearsunnyvintage" at checkout for an additional 10% off! (I already did, and bought my second dress from Eshakti for less than $30 with the code and gift coupon!)
Please note:
Code has to be entered in the ‘promotional code’ box.
It is not case-sensitive.Code can be used any number of times until 3/4/2015.
This discount code is not applicable on clearance / sale, gift cards & overstock categories, or previous purchases.


Let's stay in touch!
  &    &   


Linking up ShannaLaurenLindseyJenZarouhi, & Sarah :)

Thursday, February 12

Recipe | Heart Brownies


I have been making these brownies for years. The brownies are always a hit where ever I go: to a party, the office, or just at home. Not only are they delicious, they have the cutest design; perfect for Valentine's (or Galentine's) Day!


This recipe is the best for lazy winter days (& lazy bakers haha), because the recipe is essentially one bowl. Say good bye to the usual 5-bowl, sticky, chocolatey mess you're used to cleaning up and say 'hello' to free time lounging and munching on these delicious brownies.


Fun fact, the MF made me that heart cookie cutter. I was in a rush, and didn't have a heart cookie cutter. When I made my way to the usual stores, they all somehow sold out of theirs or had ridiculously huge ones. MF decided to make it into a hands on project! It's not store bought, but it's sincerely one of my favorite items in the world. I use it constantly, and it means so much to me, because MF made it for me so I could spread the love (& chocolate)!

Opposites Attract


      The Ingredients
       (source: Smitten Kitchen)
     Yields 32 brownies

        3 ounces chocolate, semisweet and good
                  white chocolate, coarsely chopped
        1 stick (4 ounces) unsalted butter,
                  plus extra for greasing pan

        3/4 cup plus 2 tablespoons sugar
        2 large eggs
        1 teaspoon vanilla
        1/4 teaspoon table salt
        2/3 cup all-purpose flour

        1 inch heart-shaped cookie cutter
Note: Use good white chocolate. Avoid using white morsels or white baking chips. They contain less cocoa butter making it harder to melt into a smooth mixture (ref).

     The Instructions
  1. Preheat the oven to 350°F. Line two 8x8-inch square pan with foil, then butter foil.
  2. Melt the white or semisweet chocolate with the butter in a large bowl over a pot of simmering water or microwave in 30 second bursts. When it's 90% melted, remove it from heat and stir until your mixture is smooth.
  3. Whisk one egg in at a time, then add vanilla.
  4. Mix flour and salt together, then stir until just combined.
  5. Spread into square pan and bake for 20 minutes (semisweet chocolate) and 25 minutes (white chocolate).
  6. Repeat steps 2-5 for other chocolate with second pan.
  7. Cool pans on wire rack, then transfer to the freezer if making cut-outs. Frozen brownies yield cleaner cuts.
  8. Once brownies are frozen solid, transfer to cutting board and cut each pan into 16 squares, each about 2x2 inches.
  9. Slowly, press the cookie cutter into the center of each brownie, and then set aside the cut-out.
  10. Insert white chocolate hearts into semisweet brownie centers, and vice versa with semisweet hearts.
  11. Let brownies warm to room temperature, and serve!


      Let's stay in touch 
       &    &  

      Linking up with Miz Helen & Lamberts Lately.

      Tuesday, February 10

      Recipe | Wine Gummies


      I'm a new Pinterest user, technically. I signed up a few months ago, but boy am I regretful about not using it earlier! There are so many visually appealing recipes and DIYs. That's how I found this recipe! It's a simple enough recipe, but I made a change here or there to really perfect it and keep as much alcohol content in the fruit snacks as possible ;)

      It's technically not considered day drinking, right?


      The original recipe suggested everything be combined in a saucepan. I tried that the first time, and could barely taste the alcohol with a Pinot Noir. Also I wasn't too enthused about a huge saucepan completely covered in sticky gelatin. I looked up a few YouTube videos, and found a culinary chef who put the gummy mixture in a glass measuring cup and heat it in a pot of simmering water to avoid burning it. I tried this, and the wine flavor was extremely pronounced in that batch! (aka we barely reduced the alcohol content ;D ).

      If you use molds, which I did the 5th time making these, the measuring cup can directly pour your mixture into the molds, and be one less sticky mess to clean! Also if you have foam form, it isn't bad, but not visually pretty to give people so just skim it off the top.

      Gummy love


            The Ingredients
             (source: Thrive Style)

              4 tablespoons gelatin
              1 cup wine
              (I suggest Pinot Noir or Riesling)
              1 teaspoon sugar
              2-4 tablespoons maple syrup
      Note: The amount of maple syrup used is dependent on how sweet you want your gummies.

           The Instructions
      1. Combine gelatin and wine in a glass measuring cup, and let sit for 5 minutes to activate the gelatin.
      2. Put glass measuring cup in pot of simmering water and stir slowly until gelatin mixture is smooth.
      3. Once smooth, add in the remaining ingredients and stir.
      4. When everything is dissolved, pour your mixture into a 8x8 pan for square cut gummies or molds if being given as a gift.
      5. Let cool completely (approx. 3-4 hours). You can pop them in the fridge for the cool down to speed up the process.

        If you want to bring them to a party or to work (I won't tell!), don't worry about them melting. The longer you wait, the firmer the gummy gets. They might sweat after you take them out of the fridge, so be sure to let them dry. Now go and spread the joy!


        ATTENTION ALL WINE GUMMY ENTHUSIASTS
        EDIT: (3/13/2015) Have any of you tried sugar coating your wine gummies? I have, and failed. The sugar melted and turned into a huge sugary puddle. The gummy was still intact, just sticky. From the my extensive research (hands on and via the internet), I think I may have an answer as to why wine gummies cannot be sugar coated like lemon drops. The real culprit is how you make the gummies. To retain as much alcohol content in the wine gummies, you cook the gelatin mixture at low heat, however the excess water content reacts to the sugar when you coat it. If you don't mind sacrificing the alcohol content, simmer/boil your mixture for 10 minutes (even longer if you're worried just remember to continually stir). It'll be hot, so let it cool a bit before pouring into your molds, and then you're good to go! I hope this helps you. It's not very scientific. Just a blogger making a huge mess and a ton of candy in her kitchen :)


        Let's stay in touch 
         &    &  

        Linking up with Miz Helen & Lamberts Lately.

        Monday, February 9

        Carried Away by my Heart (balloons)


        I love feminine touches like lace, florals, and frills. Yet oddly enough, I had no red or pink in my wardrobe to style a Valentine's Day outfit for you! I literally dug through my closet to find you this vibrant red turtleneck. I don't like to go too over the top with the girliness of an outfit, so I grounded the red with a checked black-and-white pencil skirt.


        And I know a blogger taking photos with balloons is cliche, overdone, overused. But I've never done it before so I took that as an excuse to do it! I got these cute heart balloons all blown up at the Dollar Store, and had so much fun lugging them around town to take these photos. Although the photos turned out great, I have to be honest, balloons are like unwieldy children in front of the portrait photographer: uncooperative, and never facing the camera!!


        Still, the photos were a whole lot of fun, and this outfit was super easy to photograph. The print is kind of retro like a tribute to 1970's. It's a bit funky, but I think the lipstick red turtleneck and curled hair helps to soften it. The pencil skirt takes the print out of the 1970's and into modern day age making it work appropriate even.


        Turtleneck | Unknown (Taiwanese boutique)
        Checkered Skirt | Asos
        Heels | BCBGeneration
        Belt | Ann Taylor


        Stay tuned this week for a jam packed schedule of Valentine's day inspired posts!


        Also, don't forget! My coupon code for Eshakti is valid until March 4, 2015 so be sure to shop their wide selection here. Just use the coupon code "dearsunnyvintage" at checkout for an additional 10% off! (I already did, and bought my second dress from Eshakti for less than $30 with the code and gift coupon!)
        Please note:
        Code has to be entered in the ‘promotional code’ box.
        It is not case-sensitive.Code can be used any number of times until 3/4/2015.
        This discount code is not applicable on clearance / sale, gift cards & overstock categories, or previous purchases.


        Let's stay in touch!
          &    &   


        Linking up ShannaLaurenLindseyJenZarouhi, & Sarah :)

        Monday, February 2

        Vintage Romance presented by Eshakti


        The last time I had something custom made for me was years ago while I was still in Shanghai. So when Eshakti approached me to review their made-to order dresses, I JUMPED at the opportunity. 

        Let me start off by saying, their customer service is courteous, quick to respond, and knowledge. I cannot stress enough how helpful they've been through the daunting process of ordering custom clothing from an online store. I mean, I kind of freaked out thinking, "what if the dress has weirdly big armpit holes??" Luckily, Eshakti knows what they're doing ;)


        The packaging was nondescript so I didn't have to worry about my package being stolen (I kid you not, this has happened to me before, and it really sucked).


        Because of the elastic in the back, the dress isn't as fitted as I'd hoped. So if you're looking for a fitted dress, be sure to check for the elastic backing in their photos, which are accurate and true to the actual garment.


        I decided to do a custom fit by sending in my measurements. It's amazing, because you only have to measure yourself once, and then they have the measurements saved to your account! No need to pull out the measuring tape twice. The only real problem I encountered is with fit. I am petite, and I believe their sewing standards are for regular so the dress was a bit big in certain areas, but not so big that it was a deal breaker.


        Hat |  Catarzi (Asos)
        Cowl Dress | Eshakti (c/o)
        Heels | Schutz
        Earrings | Thrifted
        Belt | Thrifted
        Purse | Boutique in Shanghai


        Among the sea of crew necks, this faux scarf, cowl neck caught my eye. I loved this detail, because you rarely see that kind of 1930's inspired detail in dresses. It was something so simple yet feminine; right up my alley. The sailor blue makes this dress seem elegant, and a choice candidate for any date night (like Valentine's Day!). It is so comfortable as it's made of a thick jersey-like material. I could sleep in this outfit, but that would just be a fashion crime! This is the dress of dreams, literally. I am already dreaming up ways to wear it (like with a flirty midi skirt or a flowy maxi skirt).


        All in all, I would recommend Eshakti. Their clothing is made of good quality fabric, are true to photos, and arrive pretty quickly via DHL. Their customer service is friendly, knowledge, and helpful. Best of all, they're always running some promotion like new registrants get a $30 gift coupon  which can be combined with the special discount code Eshakti and I are offering you today! So be sure to check out their wide selection here and use the coupon code "dearsunnyvintage" at checkout for an additional 10% off!

        (I already did, and bought my second dress from Eshakti for less than $30 with the code and gift coupon!)

        Please note:
        Code has to be entered in the ‘promotional code’ box.
        It is not case-sensitive.Code can be used any number of times until 3/4/2015.
        This discount code is not applicable on clearance / sale, gift cards & overstock categories, or previous purchases.


        Let's stay in touch!
          &    &   


        *Disclaimer: I was provided this dress to complete the review. However, all opinions are my own.

        Linking up ShannaLaurenLindseyJenZarouhi, & Sarah :)