Monday, September 29

Blogger Meetup Recap

Time to divulge the details of my first blogger meetup...as a blogger! I make that distinction, because I've been to one other blogger meetup before. To clear things up, I'll explain. I used to take photos for my friend, Monica of Jersey Girl Texan Heart. While I was her photographer, she planned her first ever blogger meetup, and invited me to tag along. It was fun, but also a different experience as a photographer. You're not as active among people, because as a photographer, you're used to being in the background.

This time was different. I had to reintroduce myself (I heard Jay Z's voice when I wrote that) as a blogger and my own brand. This time, I fussed over my outfit, my conversation topics, and my breath like it was a first date (with multiple beautiful ladies!). It was completely stressful, in a good way of course.

In the end, when I got there, all that stress was forgotten. I met amazing women who embody strength, the entrepreneurial spirit, and just an overall kindness. I enjoyed every minute of it, and can't wait to see them again :) Oh and these are outfits photos of what I wore that day.


When I found out my camera is pretty good with action shots, I naturally started twirling. Silliness ensued.


Button down / Express (old)
Floral skirt / Asos
Transparent clutch / DIY (tutorial here)
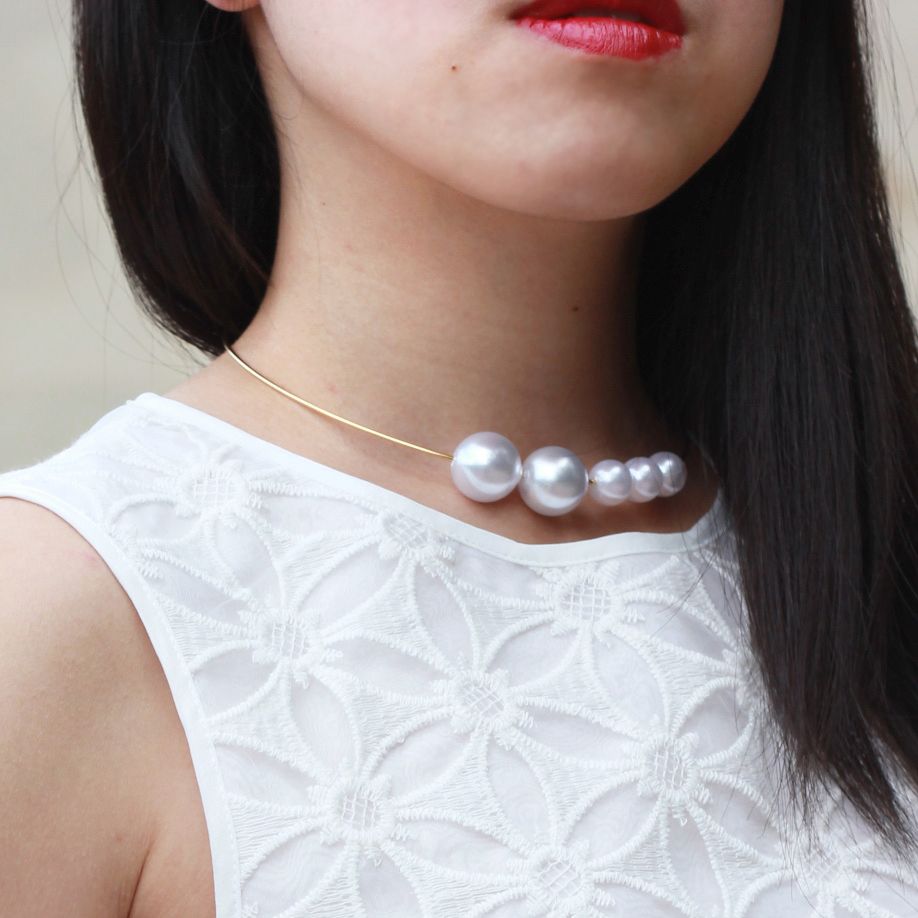
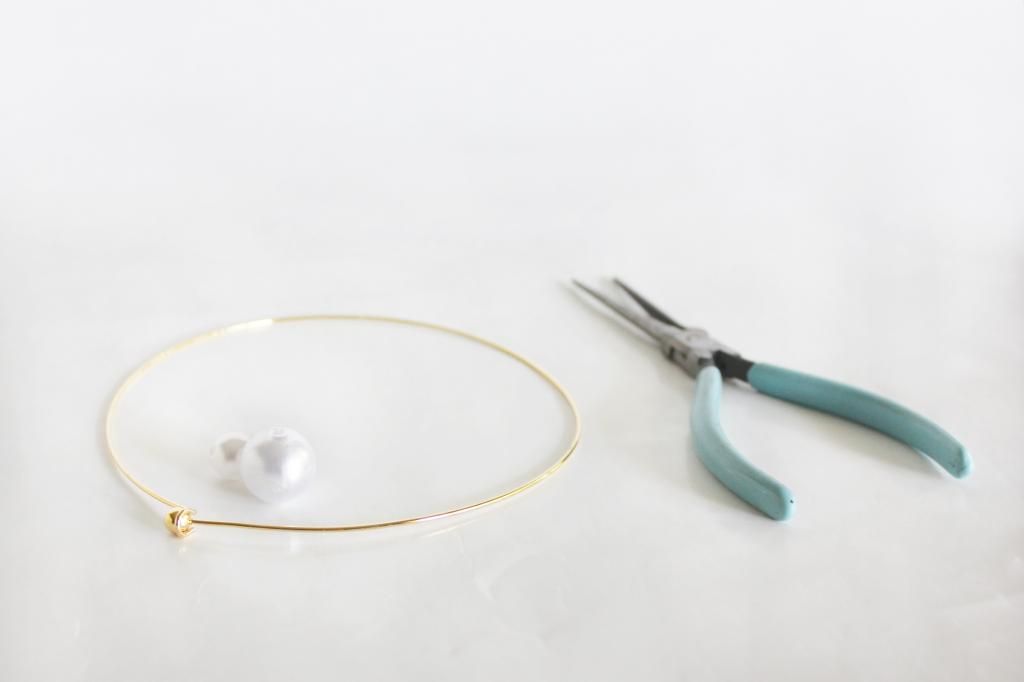
Pearl necklace / DIY (tutorial here)
Pearl earring / DIY (tutorial coming soon)


Here are the photos from our blogger picnic in Central Park!
We all brought our own food, met up, and started talking like old friends. It was an amazing feeling.

Just a little bit about each of them.

Alex is a #girlboss. She runs her own cosmetic line focused on natural ingredients that work harmoniously with your body to bring out your glow.

Sara is the cutest book worm. She loves incorporating fashion with her love of books (reminds me of Olympia le Tan and her book clutches!).

Mel is a fierce woman who can hold her own amongst the toughest. I have nothing to back this up, but something tells me I would want her there if I ever got in a fight.

Simone is the ever so fabulous creator behind Fashion Runs the World. She is one of the happiest people I've ever met, full of smiles, and totally chill when you ask her about her hair (don't ask lol..)

Sharon is a fellow Jersey blogger, and lover/mama of dogs! She's a petite woman just like me so it's fun to see what other petite women do when the fashion industry makes clothes for 6'3" 100 pound women.

Last but certainly not least, our beautiful event planner who is not pictured here. Monica is the do it all girl. You name something, she's currently doing it: full-time blogger / etsy seller of hand painted jars / fur mama to 2 dogs / corporate 9-to-5 woman / and friend. This woman tires herself out everyday, but somehow wakes up each morning smiling.


Photos courtesy of Monica from JerseyGirlTexanHeart.

If you're interested in any of their blogs, just check below for the link :)

Alexandra of Glory Boon
Sara of Sincerely Sara
Sharon of The Tiny Heart
Mel of Style is Her
Simone of Fashion Runs the World
and our lovely event planner
Monica of JerseyGirlTexanHeart

Remember to follow me on
 &    &   


Thursday, September 25

DIY | Clear Clutch

In two senses: 1) the clutch is clear, 2) you'll want to make this without a doubt.

I decided to use the clutch for my first blogger meetup...as a blogger! Eep! I don't know if I was more nervous about the meetup or the fact that my money was out in the open for everyone to see. I kept thinking to myself, "I'm such an easy target for pickpockets. I'm small, nonathletic, and have all my money on display in a clear clutch!"


Photo courtesy of Monica from JerseyGirlTexanHeart.


Ok, I know I was being dramatic, but if you've met me in person, you know how klutzy/forgetful I am, and how prone to bad situations I am.

I think this might be my best DIY thus far, which is scary. I'm having thoughts like, "Have I peaked? Is this what I'll be remembered by?" I know. I'm being dramatic again. But that's how much I love this clutch, and how amazing yet simple I think it is. It seems ridiculously high end, but such a simple (and cheap!) project that people might hate me for deceiving them :X


You need a few supplies:
  • 2 plastic frames (like these)
  • 2 hinges and 1 latch closure (like this)
  • E6000
  • Small screwdriver
  • Small bag of sorts (i.e. cosmetic bag)

So these are the main materials you probably don't have at home and must buy.

The small box is for the use of its latch closure and hinges. Use the screwdriver and unscrew everything.


If you want to be extra ambitious, strip off the ends of the screws so you're left with the head.
You can attach them later on hinges and closure after they've been glued to the clutch.

Tape the two open sides of the frames together in preparation of gluing the hinges for the clutch.
Glue the hinges along the center where the boxes meet. Make sure they are in a line so the clutch can open.

Glue the latch closure on the other side along the middle where the frames meet.
Test out the latch to make sure it can close before the glue sets.

Insert your bag of choice, and voila! You have yourself the transparent clutch :)
This is one of those things that just looks so great in person, but I can't seem to capture how awesome it is.

P.S. If you ever want to try one of these DIYs, but can't find the materials, let me know.
I can help secure the materials for you :)

Linking up with JennieLauren, & Claire Justine.


Remember to follow me on
 &    &   

Tuesday, September 23

Set fire to fall

Fall is upon us!

The first day of fall was celebrated with apple cider, various cinnamon dusted treats, and pumpkin everything...or at least it does when I don't have work. [ Don't worry, I have a pumpkin pie in the works for you ;) ]

The first signs of fall are everywhere.
Green leaves tie died yellow.
The streets littered with leaf-shaped confetti.
Pumpkin flavored lattes.

When I think of fall, I imagine the leaves on trees turning a burnt orange. A vibrant hue that surrounds us as it clutches to the last remains of summer foliage, and paints the sky. This dress epitomized that sentiment.


The French Connection maxi dress is lightweight, but has the length to shield me from fall's chilly breeze. On top of that (pun intended), I could throw a fuzzy cropped sweater over the dress for additional warmth; a style I will most likely post (abuse) in coming months.


To celebrate, I'm doing a linkup with the beautiful Brooke and Erica of Pumps and Pushups. (It goes live Wednesday at 6AM so remember to check back!) to showcase our favorite fall dresses.

The mama to-be, Brooke, is loving the gingham with her Asos skater dress. She just went on a shopping spree and bought this dress in 6 different colors! (at least she has an excuse for her shopping sprees *looks away guiltily*)

Her partner in crime: Erica, fur mama to Marley. Cardigans and maxi skirts are perfect for those early evenings, but still light and breathable for those sunny fall afternoons.

The enchanting Emily of Moonlight Chai.
She's rocking a cozy knit with a peep-toe black bootie, giving fall an edgy feel.

Rules for the link up
  • Follow my blog on bloglovin: Dear Sunny Vintage
  • Link back in your post. (fashion posts only, sorry!)
  • Easy peasy! I can't wait to see your posts :)


Join in on the link ups, and meet some new people!


Remember to follow me on
 &    &   

Thursday, September 18

DIY: Pearls are always appropriate

..as Jackie O. once said.


I love how pearls are making a resurgence in recent trends. They are truly timeless with endless opportunities to remix and reinvent.

A few months back, I saw the Tibi collection with Anita Ko and loved the varying pearl sizes. I already have go-to pearl earrings, but I could never bring myself to wear the pearl necklaces. I always feared of looking costumey. Then I laid my eyes on Anita's fresh retake on pearls. Different sizes all lined up on a beautiful gold bar.

I wasn't about to shell out a thousand dollars for a necklace I could only wear sometimes since most of my clothing covers my neck due to work. So I decided I needed to recreate it on my own!


I ran to my nearest crafts store, which happens to be Hobby Lobby, and lucked out. I found two bags of pearls of different sizes and a gold choker. I literally needed 2 things to make this happen.

Originally, I thought I needed pliers, but realized the gold ball at the end of the choker could be twisted off! So no need to strip off one end of the choker. Easy peasy!

Below is actually another version I decided to make while I was at the store, because I had recently seen Gary Pepper sporting a Ryan Storer pearl necklace that was just divine. I can't make as beautiful of a gold necklace, but I can get the concept.
  1. This time I needed the pliers to strip the one end without a gold ball.
  2. I strung the big pearl through first
  3. Then glued the smaller pearl to the cut end with E6000
  4. And there you have it! Another modernized pearl necklace :)


Remember to follow me on
 &    &  
Linking up with Jann Olson.

Monday, September 15

Daisy, daisy. Give me your answer, do.


Top / Asos
Skirt / Asos
Shoes / Schutz
Necklace / DIY
Clutch / Tory Burch


"I'm half crazy, all for the love of you" - Harry Dacre

I must be in the wrong season because I'm still dressing in florals like it's spring. I guess all the NYFW SS15 excitement has got me all mixed up! I am loving the trends for this coming spring (that 70s vibe and those big florals? yes, please), and I may have a few DIY ideas based on them already.

I wanted to try a different silhouette with my usual pencil skirt routine so I did my usual Asos perusal and saw this cute top. It's daisies in an abstract way. It also does something that scares me. It makes me look wider rather than longer, but..this blog is all about pushing my boundaries, right? So I took the plunge.

I'm not sure I'm in love with this top, but I do love the structure, the slight feel that it's architectural, and its femininity despite all of it. If I had the courage, I'd try them with jean shorts and my hair up. But maybe another time :)


Remember to follow me on
 &    &   

Thursday, September 11

Recipe | Say goodbye to your diet


These are the main players to create this ridiculously good, almost illegally good banana pudding.
That's right. Only FIVE ingredients.


After you've had a taste of this, every time after you'll want to just throw everything together as soon as possible, because you can't stand the anticipation. But before you go throwing things together like a mad woman, remember to have the water and condensed milk ready or else the pudding will congeal before you get to mix it!

These are the culprits of the fluffy pudding: vanilla pudding made with condensed milk and whipped cream.

Ah, this clutz of a chef may have walked away for too long before she remembered the whipped cream so the whipped cream you see here is over-whipped. I guess you can use this as a "don't do this" example. Luckily for this recipe, it doesn't matter as much nor does it affect the texture too much.

Meet their love child: on the most wanted list (according to my thighs)


Ok, in retrospect, I should have made this loop endlessly, because if you were kind enough to read everything before this, this might have stopped playing. It's a GIF of my assembly process. Please reload, and forgive your terrible blogger. She will learn, she promises.

Ahh...the final product. The dessert to end all cravings. One dessert to rule them all.


Warning: For some reason, every time I make this recipe, I make more than the specified 9 x 13 baking pan. I usually have enough for two pans. I think my pudding to everything else ratio is off, but just in case you have the same problem as me, buy more than 4 bananas (I used 5), and have more than one box of Nilla wafers on hand (you can snack while you work without worry now ;D ).

    The Ingredients
       (source: Amateur Gourmet)


     2/3 cup instant vanilla pudding mix
     1 ½ cup water
        (you can use less if you want)
     1 14-oz can sweetened condensed milk
     3 cups heavy cream
     1 box Nilla wafers
     4 bananas
        (the browner, the better!)

     The Instructions
  1. Whisk the instant vanilla pudding mix, water, and sweetened condensed milk together. Let sit for 15 minutes.
  2. Put heavy cream in a mixing bowl and whip until soft peaks form.
  3. Fold whipped cream into pudding mixture slowly.
  4. Arrange Nilla wafers along the bottom of your dish.
  5. Slice up the brown bananas and arrange on top of Nilla wafers.
  6. Top with pudding mixture. Shake it a bit to ensure the pudding gets into all the cracks and crevices.
  7. Repeat steps 4-6 again.
  8. Crush some Nilla wafers until they’re a powder and sprinkle over the finished pudding. Enjoy!

Remember to follow me on
 &    &